how to make 2d drawings look 3d in photoshop
From opening a 3D file to rotating, scaling and moving it, working with meshes, creating textures or fifty-fifty materials, adding lights, and more, this tutorial covers most of the secrets of the useful feature 3D Tools of Photoshop CS4 Extended. If you have it, why don't you endeavor? I can clinch you that you will discover a brand new world of infinite possibilities.
Before Getting Started
Nosotros are living on the golden age of 3D technology, we can see art pieces, architectural models, biological simulations, fantasy creatures, futuristic machines, and near realistic objects everywhere. Most of those graphics have been through Photoshop, from texture editing to concluding mock-ups; making information technology a must know tool for anyone interested in 3D design.
Photoshop CS3 Extended allowed users to open up their 3D files and edit directly some features similar textures and lights, simply CS4 takes 3D editing into another level where you tin can actually piece of work with the 3D file just like nearly of the commercial 3D editing software. Fifty-fifty though Photoshop tin't edit the model itself, it works absolutely well with textures, materials and lights allowing you lot to fifty-fifty paint direct over a surface using the Brush Tool. This is a very basic guide only some elemental cognition of 3D geometry is needed.
Tutorial Details
- Program: Photoshop CS4 Extended
- Difficulty: Basic
- Estimated Completion Time: 2 - three Hours
You will need some 3D models to play with, I'm using a boat from telias.free.fr and a costless-to-utilize model of a space shuttle that I've downloaded from the NASA website. Feel free to apply any model that you lot want. Allow's get started!
Part I - Creating and Editing 3D Layers
Photoshop handle 3D files through 3D layers, which work just like Smart Objects. Each 3D layer contains a unique 3D scene that can exist created 5 different means: from a 3D file, from a layer working as a Postcard (Airplane), from a layer making information technology a 3D bones Object, from a grayscale layer and as a Volume combining two or more layers.
This tutorial will encompass the first 4, since Volume based on layers is a little bit different than the others and we will leave it for another occasion.
New Layer from 3D File
The beginning way and possibly the most known way to work with a 3D layer in Photoshop is creating a 3D layer from an existing file. For this go to 3D > New Layer from 3D File, and so chose a file on your file organization and open it. Photoshop allows you lot to open up .3DS, .DAE, .KMZ, .U3D and .OBJ files. A new Layer with the object's proper name will announced in the Layers Panel. Yous can add as many 3D layers as you want.


Working with the Basic 3D Tools
In the Tools Panel click on the active 3D Tool (K) and and so on top, in the Options Panel, you will come across several different options for y'all to edit the 3D layer. At any fourth dimension you can go dorsum to the default values by clicking on the tiny Firm Icon in the Options Panel.
Rotate
The default tool and the first one in the list is Rotate, Click on the 3D model and Drag up or downwardly to rotate information technology around its X centrality, or side to side to rotate information technology effectually its Y axis. A diagonal Drag will rotate the model on both the X and Y axis. You can control the rotation past setting numerical values in the Orientation fields over the Options Panel, by default all of them are ready to 0.


Roll
Drag side to side or up and downward to Roll the model around its Z centrality. You lot can do the aforementioned past using the previous tool, but property the Option central on a Mac or the Alt cardinal on the PC. You can control the rotation past setting numerical values on the Orientation fields.


Elevate
This tool moves the model in the 3D space. Drag side to side to move the model horizontally, or up or down to move it vertically. Hold the Alt key to move it in the 10/Z management. This tool is very unlike than the standard Movement Tool (V) because this works over a 3D surroundings meanwhile the Move Tool works only in 2D. You can control the position by setting numerical values on the Position fields over the Options Console all values are set up in 0 by default.


Slide
Elevate side to side to move the model horizontally, or up or down to motion it closer or farther away from your perspective. You can command the position by setting numerical values on the Position fields, which is 0 past default.


Scale
This alter the model's size. Elevate up or down to scale the model larger or smaller. By setting the Scale values in a numeric format you can scale the model over whatsoever of its 3 axis, stretching it up or enlarging it. By default the numeric values are ready to ane.


Position Presets
In the Position driblet down yous will notice several position presets to chose from. Also you can save a customized Position by clicking on the tiny Save icon or delete a custom preset from the drop down box.


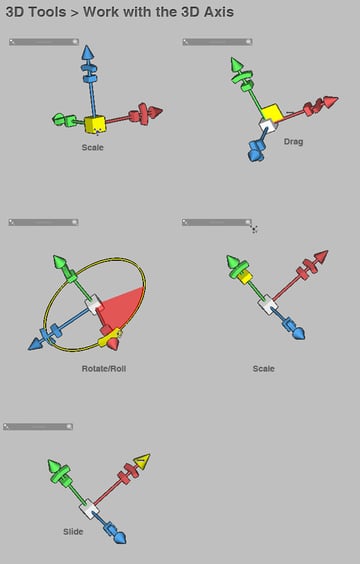
3D Axis
You lot must have Open GL enabled, go to Edit > Preferences > Performance and in the GPU panel check the box named Enable Open up GL Drawing. And so when you create a 3D file, you'll see a 3D axis handler to work with, it does exactly the same every bit the standard 3D tools, simply working straight on the axis instead of clicking on the sail. Below there's a list of the hotspots of the 3D centrality.

Camera
The 3D camera tools are used to motility the photographic camera view, while leaving the position of the 3D object stock-still. This is very useful when you want to merge 3D objects into a unmarried scene (we will meet that shortly).
Click on the 3D Camera default tool (N) to activate them. Well-nigh of the tools work pretty much the same as the Position Tools: Rotate, Move and Elevate. Y'all tin switch between Perspective (Vanishing bespeak) and Orthographic (Parallel lines) cameras, and zoom them up to 180. You can save Camera View Presets as well.


New Shape from Layer
Photoshop allows y'all to create a bunch of built in shapes from 2nd layers. Select a Layer in Layers Panel, information technology tin can be whatsoever kind of layer, so go to 3D > New Shape From Layer ...There you lot will notice several presets to chose from. As you can see at the bottom of the paradigm below y'all can create dainty pieces using only built in shapes.


Postcard from Layer
Some other manner to create a 3D layer is by converting whatsoever layer into a 3D Postcard. For this select any layer (vector or bitmap), and then go to 3D > New 3D Postcard from Layer. Then you can handle each layer as a 3D object.


New Mesh from Grayscale
Finally another way of creating a 3D layer is from a Grayscale layer. Select any grayscale slope, shape, or text layer and go to 3D > New Mesh From Grayscale > ... and chose one of the following options: plane, ii sided plane, cylinder and sphere. Beneath there's an example of 3D layers based on a gradient layer.


Merge Meshes
You tin can hands merge two or more than 3D layers into a single scene. For this y'all need 2 3D layers in the aforementioned file. In the post-obit example there is a cube and a cylinder. Select one of the layers ("Cube" in this case), then using the Camera Tool fix the View drib downward to the other 3D Layer ("Cylinder"). Finally in the Layers Panel Options Menu go to Merge Down. This manner y'all will have a unique 3D layer. Each mesh however can be edited separately on the 3D Panel.


Part Two - Working with the 3D Panel
Go to Window > 3D to show the 3D Panel. There you will find several options to accept your models into another level (you must have a 3D layer selected in order to show all the options on it).
On meridian there are 4 buttons that filter the viewing of the components of the Scene: Scene (All in one), Meshes, Materials and Lights. Below there are the Scene objects, offset there's the Scene itself, then a list of all the meshes ,each one with its corresponding textile, and below a list of the lights. You can toggle the visibility of a mesh, material or light anytime you want.
Beneath the Scene explorer there's a panel where you can modify the settings of the selected object (we volition dig into this subsequently). Finally, at that place are four little buttons: Toggle Ground Plane prove/hibernate a ground plane, Toggle Lights testify/hide the lights controls, New Light shows a list of lights to add together into the scene, and Delete, which removes the component from the scene.


Scene Render Settings
Anti-Alias
Select the Scene on the object'southward explorer in the 3D Console. Nosotros will brainstorm with the Anti-Aliasing of the render. In the settings surface area of the 3D Panel there's a Drop Downward with 3 anti-aliasing options: Draft, Better and All-time. You can modify this setting someday you lot desire. Just remember that a meliorate anti-aliasing means more fourth dimension for the system to return the image.


Render Presets
On the Preset drop dow you volition find a lot of render presets. Below are some examples.


Global Ambient Color
The Global ambient color is a global color, which is visible on cogitating surfaces (we will see more about reflectiveness shortly). By default the global ambient is set to black.


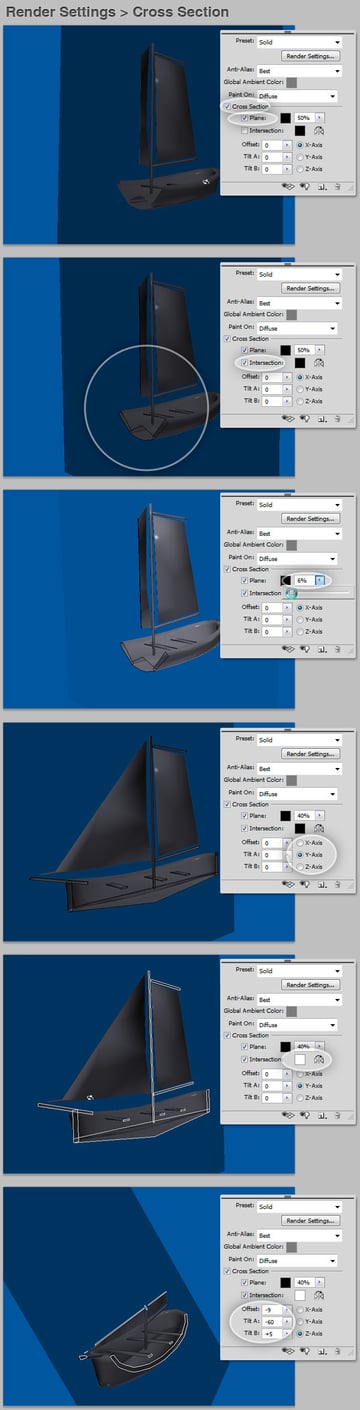
Cross Section
This setting creates a planar cross section that intersects the model trough an axis at the bending you lot cull. Information technology'south pretty useful in lodge to see through a model and view interior content. You tin can change the color and opacity of the intersecting airplane and ascertain a colour for the lines. Besides you tin change the Offset and Tilt values as you wish.

Working with Meshes
Each scene may take several meshes. You can select them one by one in the top section of the 3D panel. Once y'all select a mesh the Settings area will bear witness a miniature of the Scene and a red rectangle delimiting the mesh. Each mesh can be handled as any 3D object (rotate, roll, scale, etc.) but with the tools in the lesser of the 3D Panel, by clicking in the little Home icon the mesh will become back to its original position and scale.


Office 3 - Materials
A fabric is a complex group of texture layers: Lengthened, Bump, Glossiness, Shininess, Opacity, Reflectivity, Surround and Normal. Each ane with its very own characteristics. Combining them in a proper way results in an outstanding or even realistic consequence. To edit a material click on the mesh'southward textile and run into the Settings on the bottom of the 3D Console.
Diffuse
This texture is the color of the material. Yous can either select a colour from the swatch or create a New Texture (or Open an existing one) by clicking on the Texture Map Menu as shown in the third screenshot below.
Once you create a texture layer, information technology will appear in the Layers Panel. You can Double-click to edit information technology. A new document with a .PSB extension will be open up there. You can design anything you want. When yous save the certificate, the 3D layer will be updated.


On the Texture Map Bill of fare there's an option named Edit Properties. By clicking on information technology, y'all will exist able to chose which layers yous desire to include in the texture or the entire composite, as well setting the calibration and offset of the texture layer. This can be made on every unmarried texture of the fabric.


Bump
This texture creates bumps in the material's surface. A crash-land map is a grayscale image in which lighter values create raised surface areas and darker values create flatter surface areas. In the following instance there'southward an irregular grayscale image created with a unproblematic Castor and its respective upshot. The Bump Strength field is gear up to an amount from one to 10.
Tip: In gild to make a texture layer virtually perfect, go to Filter > Other > Kickoff, modify both horizontal and vertical kickoff and employ a clone tool to polish the edges.


Glossiness and Shininess
Glossiness defines the corporeality of light from a source that reflects off the surface and back to the viewer. Shininess defines the dispersion of the reflected calorie-free generated by the Glossiness setting. It's harder to explain than it is to endeavor. Change both values and come across what happens. Don't forget that you tin can add a texture to any of those settings.


Opacity
Increases or decreases the opacity of the material (0-100%). It's useful for creating glass textures for case.


Environs and Reflectivity
One of my personal favorites textures on a material is Environment, which stores the paradigm of the environment surrounding the 3D model. In the post-obit instance I'm adding a clouds texture to the Environment selection, and voilá, a nice reflection on the ring's surface, you tin hide the surround by toggling the eye icon of the Surroundings texture in the Layers Console.
Reflectivity hither is very important, since increases the reflection of other objects in the 3D scene, and the environment map, on the material surface. The lower the percentage of reflection the less environment is reflected.


Normal
Another personal favorite, a normal map increases surfaces details. It'south based on a multi-channel (RGB) image and helps to smooth the surface. Beneath in that location is an example of an orangish circle dawn on a normal texture. You can meet the circle zone looks smoother on the 3D model. If the RGB layer covers all the certificate, then the unabridged surface will look smoother.
Await at the instance below, with a Normal map and a Diffuse texture yous can create a nice 3D flag in less than ane minute!.


Part IV - Lights
3D lights illuminate models from different angles, adding realistic depth and shadows. Yous can add 3 types of lights in Photoshop: Infinite Lights (like sunlight), Spot Lights similar reflectors, and Point lights similar bulbs.
You can modify the position of lights, likewise colour and intensity. You tin can see them at the bottom of the scene explorer, most of models have at to the lowest degree two Space Lights that you lot can edit, or delete. To create a new layer click on the New Light push button on the lesser of the panel and chose the blazon of light that you desire to create.
Infinite Lights
Once you created or when y'all're editing a, Infinite Calorie-free, y'all can customize its Color, Intensity and the ability to Create Shadows. It's pretty useful to toggle the Low-cal Guides on the bottom of the 3D panel. An Infinite Calorie-free can just be Rotated or past clicking on the tiny Camera icon set the light on the focal bespeak. You can add together every bit many Lights as you desire.


Point Lights
This light works as if you are putting a seedling light somewhere in the model. Y'all can edit the Position, Intensity, Color, Create Shadows and Softness as well as Infinite Lights, merely yous tin Drag, Move and Rotate this low-cal.


Spot Lights
As well as the other lights, you lot tin modify the Intensity, Color and Shadows ability, move it trough the scene and change the Softness. Besides y'all can configure the position (in degrees) of the Hotspot and the Falloff.
Finally you can bank check Use Attenuation (how fast lite intensity decreases as distance from objects increases) and change the Inner and Outer attenuation values. No matter how detailed the screenshot may exist, the only way to see how information technology works is giving a try.


Role V - Some Extras
Paint On
Last but not least the Paint On... Photoshop enables paint directly over any texture layer of the Materials, Select the Paint On... texture on the 3D panel (yous must select the scene starting time) and from the Tools Console select the Castor tool and customize the settings and colors as yous want.
In the following example you can come across how to paint over the Diffuse Texture using a couple of brushes and even the Eraser Tool. At the bottom of the image below there's the event of painting on the Bump texture with a soft blackness brush.


Save Materials and Lights Presets
Since creating a material sometimes is a long procedure, information technology's very practical to create presets of Material and Lights to re-employ them later. Select a Fabric, then on the 3D Panel's Options Menu click on Save Material/Lights Preset..., type some proper name for it and save it somewhere. To Apply a preset on another mesh select Supervene upon Textile/Lights...


Conclusion
This is only a fiddling sample of what tin can be done with 3D Layers and the avant-garde 3D Panel, it's upwards to you to try these tools and explore its full potential. Skilful Luck!
Subscribe to the Psdtuts+ RSS Feed for the best Photoshop tuts and articles on the web.
Source: https://design.tutsplus.com/tutorials/a-basic-guide-to-photoshops-3d-tools--psd-6042
0 Response to "how to make 2d drawings look 3d in photoshop"
Post a Comment